
Wondering how to setup ecommerce reporting in Google Tag Manager?
Getting your ecommerce data to report in Google Analytics can be tricky, but it doesn't have to be if you use Google Tag Manager. Especially if you have an ecommerce platform or cart system that does not readily integrate with Google Analytics.
In our case, we use Infusionsoft which does not have a direct integration with Google Analytics. We had to purchase and use a WordPress plugin to get our ecommerce data to report.
Of course, you can always do custom scripts such as API calls, but that would take a certain level of technical knowhow to accomplish and this is probably ideal if you have an in-house, on-call developer (which most of us don’t).
Here is where Google Tag Manager saves the day — with the use of the data layer.
What Is A Data Layer?
The data layer is a piece of script that contains any information or variables that you want Google Tag Manager to read, and then report to Google Analytics — including ecommerce data. For the purpose of reporting ecommerce information to Google Analytics, the data layer tag will work hand in hand with a Google Analytics ecommerce tag.
IMPORTANT! BEFORE WE CONTINUE! Using the Google Tag Manager data layer using this specific methodology of implemention for ecommerce reporting is ideal if your ecommerce scenario meets the following criteria:
1. You have a simple sales funnel
2. You have 10 products/upsells or less and each order form/shopping cart goes to its own thank you page with different URLs
3. You DON’T change the pricing of your products on a regular basis
4. Your customers can only purchase one unit of a particular product
You will see later on why we enumerated these criteria as we go through the step by step of the setup process.
ONE MORE THING! Be sure that you enabled ecommerce in the view that you’re using in Google Analytics for ecommerce to report.
Now that those things are out of the way, it’s time to have fun with data layer!
There are two parts to this process — setting up a data layer push tag and setting up a Google Analytics ecommerce tag.

Setting Up The Data Layer Push Tag
This is how you push the transaction data you want to report to Google Analytics after a successful transaction and is going to fire on the Thank You Page.
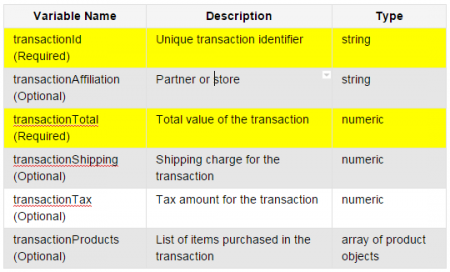
As mentioned above, the data layer contains information that you want Google Tag Manager to push, read and report to Google Analytics. When it comes to ecommerce reporting, there’s only a certain set of variables or information that Google Analytics can report. Here are those variables taken directly from Google’s support documentation:
Transaction Data:
Product Data:
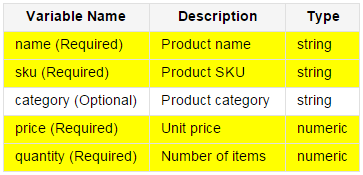
Notice that the highlighted variables are required variables and your ecommerce data will NOT report in Google Analytics unless this information is present in your data layer.
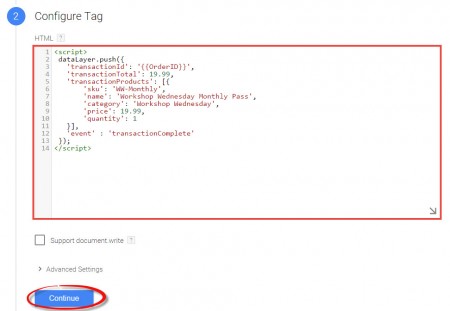
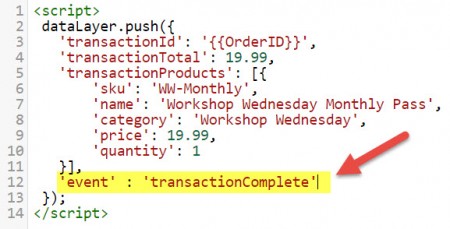
Here’s an example of what a data layer would look like:

This is the actual data layer that we use for one of our products — Workshop Wednesday. Notice that the transactionId variable is dynamically populating with {{OrderID}} which is a URL parameter variable that we setup in Google Tag Manager. This value changes with every transaction and if you’re using Infusionsoft, you can also use this variable. But the important thing is to identify a unique identifier for every transaction that you can use to setup a variable to auto-populate the transactionId variable.
Let’s briefly walk through the other variables in the data layer:
– The transactionTotal is the total value of the entire transaction. If there’s shipping involved and you want this to be reflected in the transactionTotal, you can do so
– The sku is the product code that you use to identify your products. This could be the same as the SKU that you use in your cart or ecommerce platform
– The name is the name of your product
– The price is the unit price of the product itself, excluding tax and shipping
– The quantity is the number of units of a product that your customers purchased
All these variables have a hardcoded value for them. This is where the criteria we enumerate above comes into play. For instance, if you constantly experiment with the pricing of your products, you would need to remember to update your data layer every time you change your price points, unless you can find a way to dynamically populate the data layer. Same thing with quantity. If your customers can buy more than one unit of your product, then you need to find a way to auto-populate this variable.
Also, notice that the data layer is capped with a custom even variable ‘transactionComplete’. We will use this as a trigger later on for our Google Analytics ecommerce tag.
Again, you can add the other non-required variables to your data layer if you wish.
Setting Up The Data Layer Push Tag
Once you have your data layer, it’s time to fire it in Google Tag Manager. Here’s how.
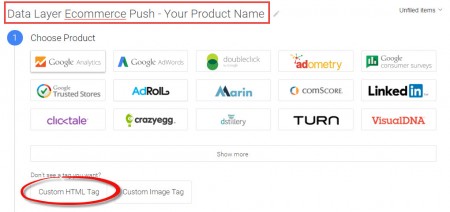
Step 1. Create A New Custom HTML Tag
Name your new tag. I suggest having “Data Layer Ecommerce Push” on the name so you know it’s a data layer push tag and then add for which product it’s for. Then choose “Custom HTML”
Paste your data layer script and click on continue.
Step 2: Setup Your Trigger
The simplest way to fire your data layer push tag is to fire it on the Thank You page after a purchase. To do this, you need to setup a Pageview trigger and fire it on the Thank You page after a purchase.
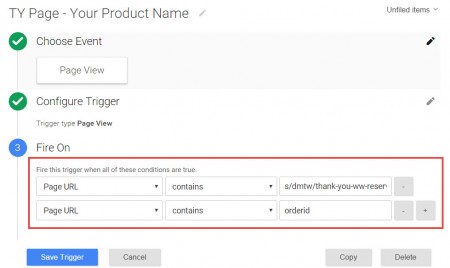
Name your trigger so you can easily identify that it fires on the Thank You Page for a specific product purchase. Choose Pageview for Trigger Type and then enter the URL of the Thank You Page.
If there’s a fragment that gets attached to the URL after a transaction, you can use that to ensure that you are indeed firing the data layer on successful transactions (in the case of Infusionsoft, the orderId parameter gets attached to the URL after a purchase so we used it in the trigger conditions as you see below).
Save your trigger and publish your changes.
You’re done with the first part of the process.
Setting Up The Google Analytics Ecommerce Tag
Now that you have a data layer containing your ecommerce data getting pushed to the thank you pages, you now need to tell Google Tag Manager to read the data layer and report the information to Google Analytics.
This is what the Google Analytics Ecommerce Tag is for.
Here are the steps in setting up the ecommerce tag.
Step 1. Create A New Google Analytics Tag
Name your tag and choose Google Analytics under product.

Then…
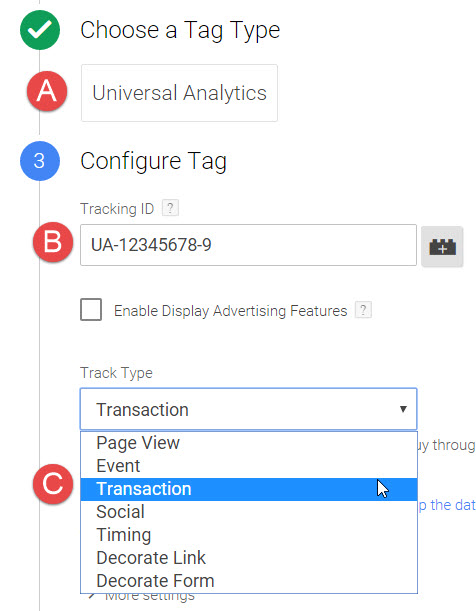
(A) Select Universal Analytics as the Tag Type,
(B) Enter your Google Analytics Tracking ID, and
(C) Choose Transaction under Track Type.
Then click on Continue.
Step 2. Set Up Your Trigger
Remember the custom event that we used to cap the data layer? If not, here it is again:
We will use this custom event to fire our tag.
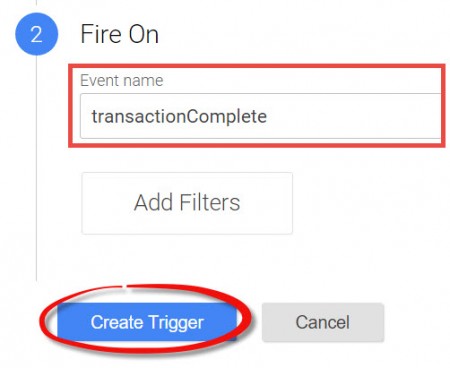
Create a new trigger and choose Custom Event.
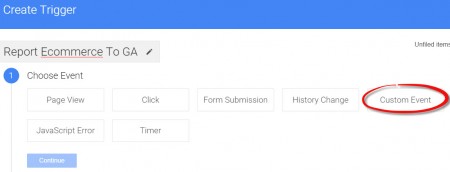
Under “Fire On,” enter the name of your custom event. In our example it’s transactionComplete.
Then click on Create Trigger.
Publish your changes.
You Are Done!
You now have a tag that pushes the data layer containing the ecommerce data after a successful transaction AND a Google Analytics Ecommerce tag that reads the content of the data layer and report the information to Google Analytics.
Your next step is to make a test purchase to verify that your ecommerce data are reporting in Google Analytics. Take note that there could be up to 8 hours of delay before ecommerce transactions show up in your Google Analytics report, so make sure to test before major traffic hits your sales funnel.
The data layer is a powerful tool that marketers can use, not only in ecommerce reporting, but in other funnel tracking as well. For example, you can use the data layer to push several information after an opt-in. For one of our clients, we use the data layer to automate our opt-in event tracking. As long as there’s a “status” variable in the data layer that says “opt-in”, there’s a corresponding event that gets reported in Google Analytics. But ecommerce reporting is definitely one of the main reporting areas that you can use the data layer.
I hope this post helped you figure out how to setup ecommerce reporting in Google Tag Manager. Whether you already have an ecommerce tracking in place and you’re looking for an alternative or even if you’re just going to open your online ecommerce platform.
If you have questions, please feel free to post them through the comments section below. And of course, feel free to share this post.
Until the next Google Tag Manager post!
– Darwin
P.S.
If you want to learn more about using the data layer to track ecommerce and other user behaviors, you can join Measurement Marketing Academy today. You will discover other creative and innovative tracking and measurement strategies/techniques so you can get more leads, acquire more customers and increase your ROI.