I should be the first one to admit that the there’s a bit of confusion on this topic. So let’s set things straight.
Google Tag Manager is not a substitute for Google Analytics.
When you’re migrating from Google Analytics to Google Tag Manager, what you’re really doing is moving the control of what and how data is going to report in Google Analytics to Tag Manager. Essentially, you’re taking away the heavy lifting from Google Analytics and letting Tag Manager do the work, which basically means that Google Analytics will be your data dashboard and Google Tag Manager will be your control room.
Migrating to Google Tag Manager
Now that we’ve established that, time to migrate!
The very first step is to create a Google Tag Manager account.
Here’s how:
STEP 1.
Go to https://tagmanager.google.com/, sign in with your existing Google Account info and click on “Create Account” (it should be on the upper left side, just below the Google Tag Manager logo). And then name your account.

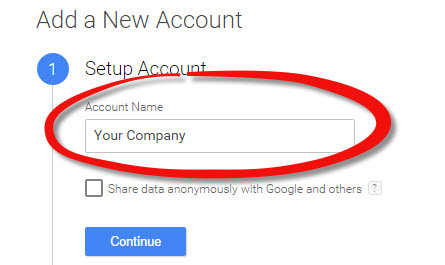
STEP 2.
Name your container, choose whether you’re tracking a website, an iOS App or an Android App, and then click on “Create” (Step 1, 2, and 3 respectively below).
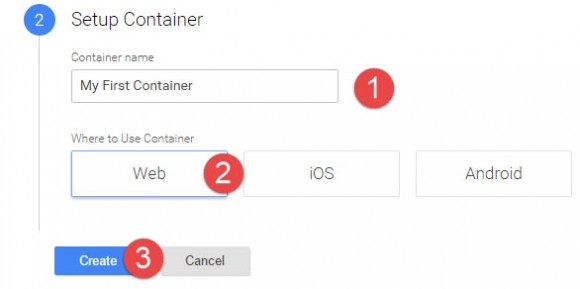
QUICK NOTE: In terms of hierarchy, an account can hold multiple containers and your containers will hold your tags. For example, if you have several businesses, each business can have its own account. If each business has different websites (or if you have a website that have several sub-domains), each website or sub-domain can have its own container.
STEP 3.
Agree with the Google Tag Manager terms and conditions. After that a window will appear containing your Google Tag Manager tracking code.
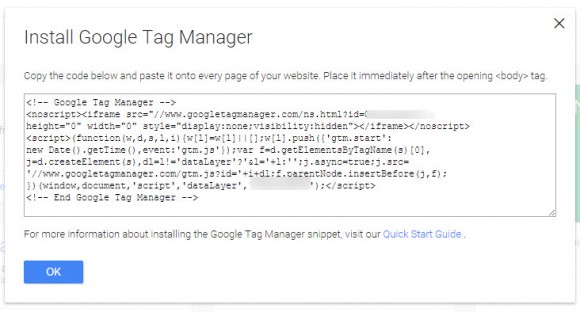
This will replace your Google Analytics tracking code that is hardcoded on your website. Copy this code and put it right after the opening body tag of your website across all pages. Here’s a quick start guide on how to install the code on your site.
Once you’ve created an account and a container, it’s time to create your first tags.
When migrating to Google Tag Manager, it’s a matter of prioritizing the tags that you need to setup first. The critical tags that will ensure that a seamless transition and that you don’t lose important data in Google Analytics.
When we help our clients migrate to Google Tag Manager, here are the 3 critical tags that we prioritize:
1. Pageview Tag
2. Event Tags
3. Marketing Pixels
Let’s go through these tags one by one.
1. Setting Up The Pageview Tag
This should be the very first tag that you should setup in Google Tag Manager. As its name suggests, it tracks traffic coming into your site and the metrics associated with it such as number of users, unique pageviews, bounce rate, etc. As you can see, these are the most basic yet most critical data that you need in Google Analytics, which is why this tag should be your #1 priority.
Here are the steps in setting up a Pageview Tag:
STEP 1.
On the left menu, click on “Tags” and then click on “New.”
STEP 2.
Name your tag (ideally, something that indicates that it’s a Pageview Tag), select “Google Analytics” under “Product” and choose Universal Analytics. Click Continue.
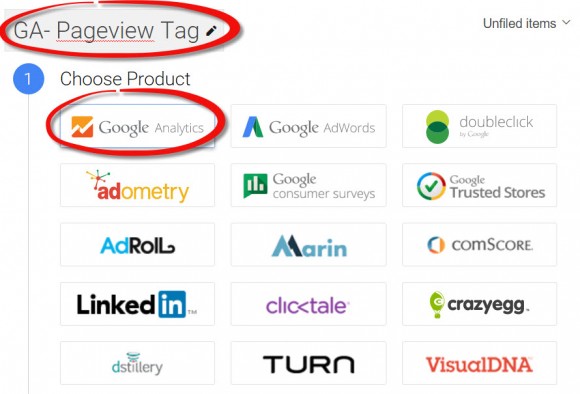

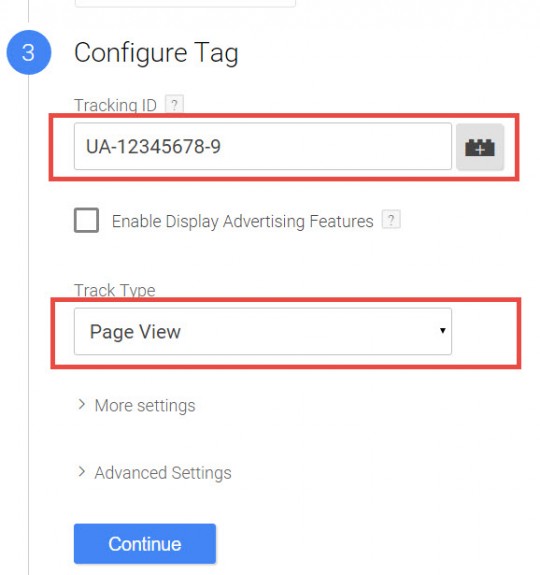
STEP 3.
Enter your Google Analytics Tracking ID under “Tracking ID”. For “Track Type,” “Page View” is already pre-selected so you don’t have to touch this one. Click on “Continue.”
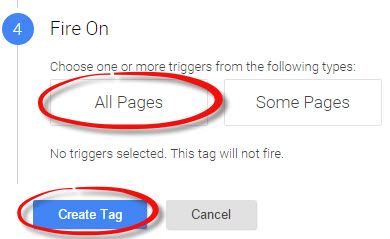
STEP 4.
This is where you set the firing rule for your pageview tag. In Google Tag Manager, a firing rule is basically a set of conditions that have to be met for a specific tag to fire. The pageview tag must be fired on all pages. Once you’ve selected “All Pages” click “Create Tag.”
That’s it! You now have your Pageview Tag in place, arguably the most important tag that you need to setup when migrating to Google Tag Manager. At the end of this post, I will show you how to verify if your pageview tag is firing properly, but for now, let’s go to the next type of tag that you need to prioritize during your migration tag manager migration process.
Before you start with the next steps it is a good idea to make sure your basic Google Analytics Set Up is correct. After all, if you aren't using Google Analytics correctly or don't have everything set up, trash data filtered and other steps completed, your data will always be skewed – no matter how awesome your tags are set up.

2. Setting Up Event Tags
These tags will replace the hardcoded event codes on your website. Personally, I would like you to focus on two categories of event tags: (1) Onsite and offsite clicks and (2) Events that trigger goal completions.
Setting up tags that fire events for onsite and offsite clicks allow you to see in Google Analytics what internal and external links users are clicking during their session. This will give you an idea which links your visitors are clicking on the most and if they are staying in your site or exiting to external pages.
How to Setup Onsite Clicks Event Tag?
STEP 1.
Before you create the actual tag, you need to activate some of Google Tag Manager's built-in variables which you will use later on to label the parameters of the event tag. Variables are basically name-value pairs wherein the value are dynamically populated during a session. For example, the built-in variable Page URL is populated with the current page's URL during a session.
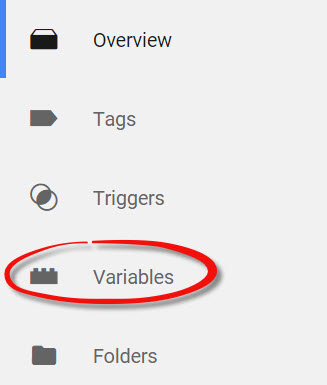
To activate the click-related built-in variables, look for “Variables” on the left navigation menu and click on it.
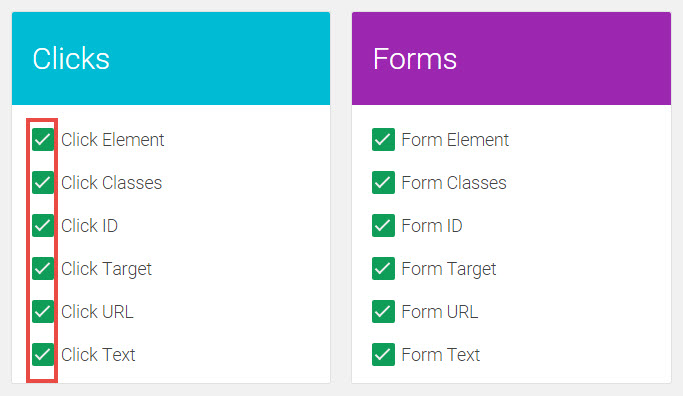
This will bring you to a page that lists the different built-in variable. Look for “Clicks” and check everything under it. We also recommend activating the variables under “Forms” as they also come very handy based on our experience.
STEP 2.
Create New Tag. Name your tag properly so you know immediately that it’s an event tag that tracks internal clicks. Choose Google Analytics from the Product List and click Continue.
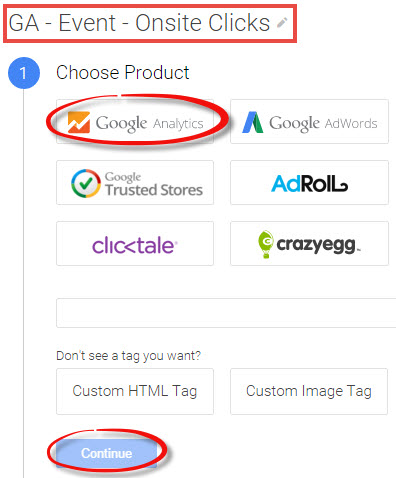
STEP 3.
Choose from either Universal Analytics or Classic Analytics. Enter your Google Analytics Tracking ID and from the drop down menu under Track Type, choose “Event.”
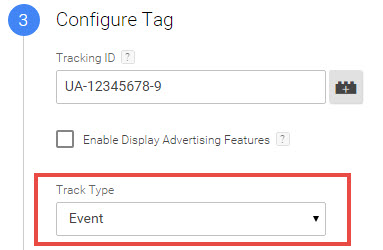
STEP 4.
Configure your event parameters. This is how the event will report in Google Analytics. We usually use “Onsite Clicks” for event category. For Event Action, we dynamically populate it the {{Click URL}} which you will see when you click on the icon on the right side of the input field. This will show you where the link lead to.
For Event Label, we usually use {{Click Element}} which will show you what element was clicked (i.e. Red Button, etc.). You can leave the value parameter blank. Click on Continue.
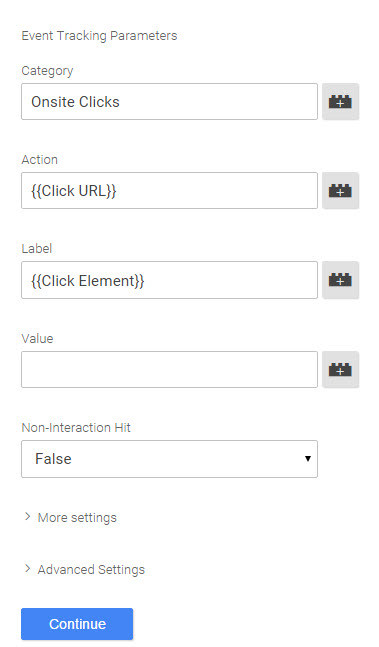
STEP 5.
Finally, set your firing rule. Choose “Click” as the trigger type.

Under Targets, select Just Links from the drop down menu. If you select All Elements, the event will fire every time a user clicks something anywhere on your webpage, whether it’s a blank space, a non-clickable image, etc. By choosing Just Links, you are only tracking actual link clicks. You can leave everything else as is and click Continue.
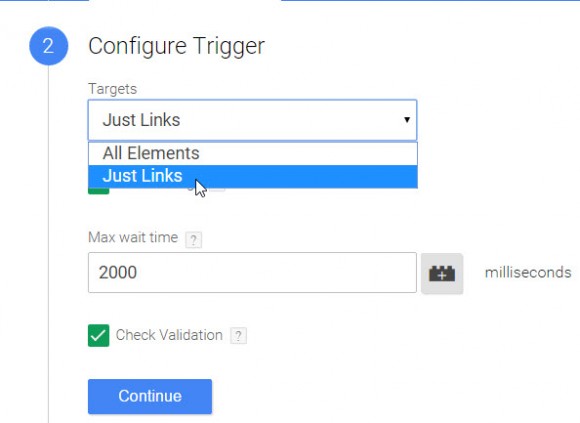
Under Enable When, you would want to fire your tag across all pages of your website to track onsite clicks everywhere. To do this, choose Page URL under the conditions, choose “matches regex” as the operator, and enter .* on the third field. This will track all onsite clicks across all pages.

Finally, set the condition on when the tag will fire. We only want to fire this tag on link clicks that leads to pages within your own site. First, choose “Some Clicks” as you only want to fire this for internal clicks.

A configuration panel will appear. Choose Click URL from the leftmost dropdown, choose “contains” as the condition and enter your domain on the third field. Basically, what this means is that this even will fire as long as the URL where the click redirected contains your own domain – in short, an internal click. Click Create Trigger, save your tag and that’s it!

How to Setup Offsite Clicks Event Tag?
To setup a tag that will track offsite or external link clicks, you just need to follow the same steps, change the Event Category to “Offsite Clicks” or “External Clicks” and when you create the trigger, you should set it to fire when the Click URL DOES NOT CONTAIN your domain.
Setting Up Events That Trigger Goals
When migrating to Google Tag Manager, an important step is reviewing your active goals and creating a list of your event goals. Since you’re removing hardcoded event codes on your website, you need to migrate all event codes that are embedded on your page to Google Tag Manager.
Particularly, take note of the Event Category, Event Action and Event Label that you are using to fire these goals as you need to use the same labels when you set up the event in Google Tag Manager.
You need to follow the same steps as above – naming your tags appropriately, setting the event parameters and setting the trigger. The key is you fire the even using the right trigger. For example, if you are setting up an event that tracks opt-ins you can set up a trigger based on a form submit or when the users see your opt-in thank you page.
That’s it for setting up event tags. The next tag is equally important, especially in ensuring that you’re not losing valuable ecommerce data.
3. Setting Up Marketing Pixels Tag
Probably the most common marketing pixel that a lot of marketers use is the Facebook remarketing pixel. This pixel is typically hardcoded on your website, but one of the main advantages of Google Tag Manager is being able to keep all your marketing pixels under one roof (Read the other benefits of Google Tag Manager here). This way, they are easier to manage and you can easily deactivate pixels that are not is use.
Let’s use the example of a Facebook Remarketing pixel for our step by step.
STEP 1.
Make an inventory of all your hardcoded pixels and put them in a spreadsheet. Then start moving them to Google Tag Manager. Let’s say you’re starting with a Facebook Remarketing pixel.
Create a new tag, name your tag, and choose “Custom HTML” under Product.
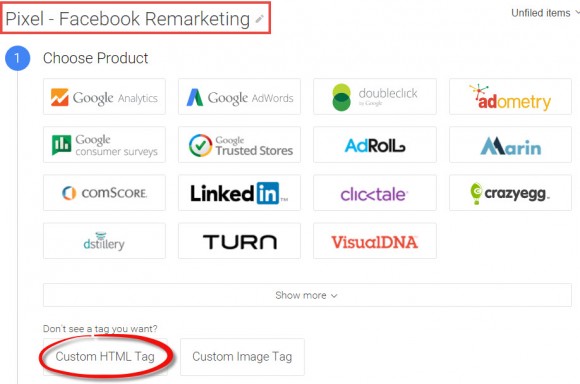
STEP 2. Paste your pixel code on the allotted field. Click Continue.
![]()
STEP 3. Set your firing rule. Since this is a Facebook Remarketing Pixel, this will fire on All Pages. For conversion pixels, fire them only on pages/events when conversion happens (i.e. form submits, views of thank you pages, button clicks, etc.). Create your tag and you’re done!
In Summary….
That completes the list of the critical tags that you need to prioritize when you’re migrating to Google Tag Manager.
Just to recap, these are:
- The Pageview Tag
- Onsite/Offsite Clicks Tags and Event Goals Tags
- Marketing Pixels
Once you’ve setup everything, don’t forget to publish your container for these changes to take effect.
Before I let you go, here’s an IMPORTANT TIP…
Verifying That Your Tags Are Working
It is extremely important that you check and verify if your tags are working. If you don’t do this, you will lose valuable data that are important to your marketing.
So, how do you verify if your tags are working. First, you can use Google Tag Manager debug tool which will show you the tags that are firing on specific events on your site. For example, the Pageview Tag will fire as soon as you hit the page. It’s a console that will appear on the bottom of your browser, that looks like this:

However, it’s not enough that you’re using the Google Tag Manager debug tool. You have to verify in Google Analytics that you’re seeing the data you need. How do you do this?
First, remove the hardcoded Google Analytics Tracking code on your website. Then browse through your website and check the Google Analytics Real Time Report if you’re seeing the pages you’re viewing coming through. Same thing with the events. Remove all hardcoded events on your website and check the real time report if the events you are taking are still coming through. Make test opt-ins and check out the goal completions in the Real Time report. If you can still see data reporting in Google Analytics after you’ve removed the hardcoded tracking codes, then Google Tag Manager is working.
Migrating to Google Tag Manager definitely has its advantages and I highly recommend that you do so. I cannot imagine how I survived without it before!
The steps above may seem to be a long list, but once you’re familiar with how Google Tag Manager works, it will not take you more than a couple of hours to perform this basic migration process.
Do you think you’re ready to migrate to Google Tag Manager? If not, what information do you need to get the ball rolling? Would love to hear your thoughts! And please feel free to share to anyone you know who’s thinking about migrating to Google Tag Manager and looking for a step-by-step guide.
Until the next Google Tag Manager post!
-Darwin
